The no fuss, no muss guide to installing the latest stable version of MySQL DB locally on your Mac running OS X 10.7 or later. (Hat tip to Trey Piepmeier for his excellent tutorial, upon which I improved a few things.)
Assuming you have your brew command ready to rock, make sure to run a quick brew update, telling brew to fetch the latest packages:
OK? Good. Now you need to tell brew to install MySQL by entering this command:
Enter the following two commands, one after the other (the second one starts up your new, local MySQL server and creates an initial database):
Launch MySQL Automatically
The output from that last command should instruct you to enter three additional commands. (The ones below might not be exactly what you see in your terminal. Of course, make sure you follow those instructions and not these below, unless they’re identical.):
The three commands above do the following, respectively: create a LaunchAgents folder for you if you don’t already have one, copy the mysql.plist file into that launch folder, and then loads that file into a system file so that Mac OS X starts MySQL for you each time you restart your machine. Perfect!
Start Configuring MySQL
One final (optional) step is to run the included MySQL root/user config script. It’ll step you through various default username/password/etc options that you might want to configure now that you’ve got MySQL up and running on your machine. To run this automated post-MySQL-install wizard, enter:
How to Install Homebrew on Mac OS X (10.7 or later)
This one’s super-quick and easy! If you want to easily install other tools and add-ons in the future, you need Homebrew.
Open a new shell and run the following:
It’s that simple. Really.
Homebrew Future Tip
Once Homebrew has finished installing, you’ll want to make sure to always run the following before trying to install anything using the brew command:
Running Brew’s update command instructs it to fetch the latest install recipes from its remote repository. Remember: Before you use Brew to install something, you definitely want to run the brew update command Every single time! That way, you’ll always ensure you’re installing only the latest, stable packages.
That’s it! You’re done.
Want to learn more about Brew on your own? Check out: http://brew.sh/
So you’re sick of the lame, default settings that OS X’s Archive Utility comes with and you want to change ‘em? Yeah—I did too. So, here’s three ways to change that little tool’s settings to whatever your heart desires once and for all! (…or temporarily if you’d like; I don’t much mind either way to be honest with you.)
Unless you’re as fast as Superman and can open Archive Utility’s preferences pane during the roughly 0.0006 few seconds that it’s displayed on the screen during its unarchiving process, it seems the only way to change the default preferences are:
How to Change Archive Utility Preferences
Launch Archive Utility manually and change the preferences as you would in any other app: Open up Terminal and type: open -a Archive Utility
If you’re the type that doesn’t want anything to do with opening Terminal (not that there’s anything wrong with that) or one that prefers clicking the mouse a few more times, just for sport:
Click on OS X’s Finder (usually in the lower-left of your dock), then go to the very top OS X menu bar and select “Go” and then “Go to Folder…” Then, just enter the following—/System/Library/CoreServices—and smack the enter key on your keyboard (or gingerly click the “Go” button with your mouse—again, totally up to you. I prefer smacking the enter-key, myself.)
At this point, you need only find the Archive Utility App within the Finder window and give her the ol’ double-click to launch.
Let’s Get All Fancy-like
Want to add a new icon to OS X’s System Preferences app, enabling all users to set their own Archive Utility preferences? Do the following:
Open up Terminal and enter this beautiful one-liner:
In the Finder window that opens as a result, locate and double-click on the Archives.prefPane file.
If you’re asked to enter your Admin password, DO IT IMMEDIATELY WITHOUT HESITATION. This isn’t a drill and your life could depend on it. Of course, that’s simply false. But the truth is that at this point, OS X wants to add a dedicated preference icon for Archive Utility to its System Preferences App and wants you to confirm this action by entering your password. Honest!
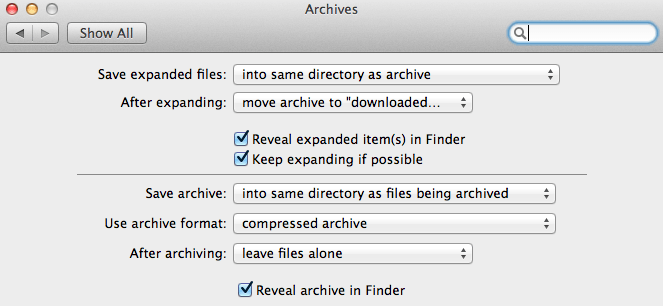
Enjoy the following panel that you now have access to and configure the settings until you’re blue in the face!
Hat Tippity Tip / Source:
This “how to” article was adopted from one I originally read on TAUW right here, which itself was apparently adopted from an even earlier article, currently located on Macworld.com right here. Enjoy!
What’s that? You’re making a Rails app, planning on eventually pushing it to Heroku, and you’re still running SQLite locally on your machine? Like a chump!? Come on now!
You’ve got to install Postgres locally! The good news is: It’s super easy.
First Things First
You’ll first need to install PostgreSQL. For this tutorial, we’ll use Homebrew to help us do that quickly.
Open terminal and type: brew -v This will return the current version of brew (if you have it installed). If you do have it installed, update it with the following command: brew update
That was pretty simple
If you saw a command not found: brew (or similar) error after you ran brew -v, then you likely need to install Homebrew. If you would like to do that now, type the following into your terminal:
Pro Tip
If at this point you’re thinking of installing Homebrew, consider first reading more about installing Homebrew in this article I wrote on How To Install Homebrew on Mac OS X 10.7+.
With brew installed, you’re golden. Time to install PostgreSQL!
Install PostgreSQL and Configure
With Brew, you can install PostgreSQL with the following command in Terminal:
You can now start your PostgreSQL server and create a database:
Optional You’ll need to have PostgreSQL running locally in order for your app (running in development mode, of course) to read and write to your Postgres database(s). If you want to have PostgreSQL start automatically each time you start your computer, enter the following three lines into Terminal one after another:
Done and done. PostgreSQL is up and running and now all you need to do is tweak a few setting in your Rails App’s database.yml file (in the config/ folder).
In your database.yml file, you’ll see a few environments and their respective configs beneath. Most likely you’ll see three environments: development:, test:, and production:.
For now, we’ll just change the development: environment. If you haven’t changed anything, you’ll see the following as the default config for development::
In order for your app to use your new PostgreSQL server, you’ll want to change the above to this:
Super-awesome Protip
You’ll want to replace name_of_your_app with the name of your app.
Editing Your Gemfile
Hold on there partner, don’t forget to tweak your Gemfile! Make sure the you’ve got the pg gem in your gemfile:
Want To Run PostgreSQL in Production?
If you want to run Postgres in your production environment as well as your development environment, make sure to add the gem 'pg' line somewhere within the :production block—and not only within your group :development, :test do block.
Finally, you’ll want to create a new database: rake db:create and you’ll probably want to run the following command to delete your tables, recreate them, and seed them with any data you may have in your seeds.db file with the following command: rake db:reset
Trying to install PostgreSQL on your Linux machine instead?
Dan Manges is crazy-smart, the CTO of Braintree, and happens to be my mentor while at Code AcademyThe Starter League. He saved me about three hours of chin-scratching, by teaching me everything below today (in about 15 minutes). Thanks man! (Probably worth noting that any errors below are courtesy of yours truly—and not Dan :)
Deploying your Rails 3 app to heroku (on their Cedar stack)?
Protip
Don’t forget to run this command—ya know, just as you would when first running the app locally on your own machine. (Might save you 20 minutes of chin-scratching!)
Here’s a tip when using Rails’ button_to and link_to URL helpers! Never ever forget these two things:
button_to uses the :POST method by default
link_to uses the :GET method by default
Believe me: Memorizing these two simple Rails defaults will save you routing headaches down the road.
Example — Specifying the :GET method:
Let’s say that you’d like to provide your user with a “Cancel” button on a form that redirects her back to the previous page after it’s clicked. (Because you’re nice, you’ll also throw up a warning modal…):
Guess what? That’s not right! When clicked, that button will either throw a routing error or unintentionally make a post request to one of your routes. Instead, you need to specify that you’d like the button to use the :GET method, instead of its default :POST method. (refer to rule 1 above.)
Here’s the correct code for such a button:
See how we specify the method in there with method: :get?
Example — Specifying the :POST method:
Want a text link that ends up sending sending a :POST to one of your routes? Simple. Just remember to pass the correct method:
If you wanted a button to perform the same action, you wouldn’t need to specify the method, as the default method is already :POST:
Example — Specifying the :DELETE method:
Just as you need to pass in the proper HTTP method into your button_to and link_to helpers if you’d like to use them for the opposite of their default method, so too must you specify the :DELETE method when you’d like to use that instead:
Over the past few weeks, I’ve been working on an app with three other people. The four us divided up the necessary work that needed to be done, chose parts to work on that we found interesting, and then got to work.
How do multiple people add to, modify, and delete the project’s codebase (and other files)—all while keeping track of everything along the way?
As soon as we asked this question, the answer was simple: use Git!
What is Git?
Git is a Distributed, Revision Control System
Using Git, multiple people can easily work on the same project, at the same time, and keep track of all changes. In addition to providing a detailed history of who did what and when, Git empowers collaborators to revert back to a previous version of a project’s codebase (or a previous version of, say, a single file), should broken code or otherwise undesirable changes occur at some point.
Using Git in Your Own Projects
After creating your project, cd into your project’s working directory via terminal and initialize Git with the following command:
Git is now good to go and is ready to keep track of the files in that directory. Make changes to some code, return to terminal, and type the following:
Notice the . (period) at the end? That tells Git to add all of the new and modified files to it’s index. In other words, Git is now tracking every file in that directory and will know when changes are made to existing files or when new files are added.
Note:
If you ever delete a file from your project—and you want to track that deletion in your Git repository—you should type the following command in terminal:
It’s similar to the previous command, but passing in the -A option will tell Git to “add” the files that you removed from your project. (You can think of this as Git keeping track of the fact that you just deleted a file.)
Committing Files
So far, Git has been initialized and is also tracking all of the files in your project (including any changes you’ve made so far). But, you’ve yet to commit these changes. These commits are the snapshots of your project that Git will keep a history of, enabling you to rollback or revert to at some point in the future should you so desire.
To commit your changes—and thus make your first/initial commit for this project—type the following command in terminal:
This commits your changes. Note the -m option that we’ve passed in as well as the 'initial commit' message following it. As you might guess, the -m stands for “message” and the text in single (or double) quotes following it contains a message that will be saved along with the commit. (You should always pass in a descriptive note that will enable you (and/or other developers reading it later on) to quickly decipher what changes you made for that particular commit.
Part Two: Coming Soon
This post covers the basics of using Git for your personal projects. In the next post, I’ll detail how using the above-listed commands—as well as a few other commands—will enable you to use Git for a single project with multiple collaborators as I described in the opening paragraph.
After graduating from college, I wisely decided to pursue my interests in technology and got a job working at Mahalo in Santa Monica, CA. (Many fun stories on this experience, of course. I’ll save them for future posts—including, “Greg’s guide to getting a job at a startup”. Good times.) After Mahalo was slapped by Google (note to self: avoid building a business entirely reliant on another company for both traffic and revenue) I parted ways and joined the team at Border Stylo.
I absolutely fell in love with startups. I soon realized that I wanted to become more technical myself so that I could start actualizing my own ideas and start a company of my own. Enter Code Academy.
Of course, there are manynice, free, online and interactive “teach yourself how to program” resources these days that enable an aspiring developer to teach herself various languages at her own pace, on her own time (not to mention all of the free and paid video courses that have been available for years).
But, I was looking for something that met the following criteria:
I wanted to do this full-time and completely immerse myself without any distractions;
I wanted an environment where I could work alongside others that were equally as dedicated and passionate about becoming developers;
And, I wanted an adventure—I wanted to travel and live somewhere new for a while. Code Academy offered my all of these things and more so I jumped on the opportunity, applied for a spot, was accepted (duh), and made it happen. In talking with some of the then-current (now former) students before and while I applying, I was left without any doubt: this was the program for me and would be awesome.
The Focus
The focus over the next 12 weeks (the duration of Code Academy) will be Ruby on Rails, and a healthy dose of HTML, CSS, and Javascript to be dangerous. In talking with folks, it’s clear that many are looking to land a gig at a startup or dev shop once things are done, others are focusing on an existing idea for a web app that they came into the program with already and will pour everything they learn into that one idea, while many others are somewhere in between.
Code Academy offered a design class this quarter and so we’ll also be working closely with them throughout on the various projects we create throughout, hackathons, demo-day projects, etc.
The Beginning
Things have only just begun and so there’s not too much to share yet. But count on the fact that I’ll be posting regular updates on my progress, funny anecdotes, and everything in between in the coming weeks and months while I’m in Chicago.